Assemble odds and ends from your workshop or the Lowe’s hardware aisle to build Frankenchimes — clanking Halloween wind chimes.
Tools
Drill and bit set
Needle-nose pliers
Wire cutters
Fast-set epoxy glue
Materials
(all of these materials can be found at Lowe’s, including product numbers)
Black duct tape, #327363
3/16-in twisted polypropylene rope, #349234
19-gauge galvanized steel wire, #62943
4-in galvanized band clamp, #120906
1-quart empty paint can with lid, #27318
6-in to 4-in galvanized duct reducer, #36407
2 – 1-1/2-in galvanized corners, #102894
3/8-in x 1-in hex bolt
1/2-in x 1-1/2-in hex bolt
2 – 3/8-in-16 nuts
1/4-in stainless-steel cap nut
7 – 1/2-in zinc-plated hex nuts
#8 x 7/16-in zinc-plated washers
2 – 1/4-in stainless-steel fender washers
3/4-in washer
2 – 3/8-in washers
5/16-in x 1-1/4-in washer
4 – 1/2-in x 2-in washers
Assorted springs, #191811
2 – Weatherguard U-bolts, #196877
3-in x 3-in zinc-plated T-plate, #315655
10-ft weldless black steel chain, #348459
6-ft weldless chrome metal chain, #348454
1-in poplar button, #81609
Valspar spray primer, gray
Valspar spray paint: Everglade Glen, Island Orange, Tropical Oasis, Flat Black
Project Resources
Frankenchime Parts Diagram
Instructions
You can buy all of the materials listed here and on the downloadable Frankenchime Parts Diagram, but it’s best to sort through and use leftover hardware already in your shop. Feel free to modify the design to suit your own hardware supplies and preferences. Key pieces you’ll need to buy are the paint can for the head, duct reducer for the body, a 4-inch clamp, and 19-gauge wire for the assembly.
Prepare the Sections
Step 1
Drill a centered 1/8-inch hole through the bottom of the paint can. On opposite sides of the can, drill holes to fit the two hex bolts about 1-1/2 inches from the open end of the can. We drilled at slightly different heights for a fun effect.
Step 2
On the duct reducer, drill 1/16-inch holes for the galvanized corners, and then drill two opposite 1/16-inch holes about 1/2 inch below the lip of the narrow end.
Step 3
Prime and paint green the empty can for the head and at least one 1/2-in x 2-in washer (Everglade Glen shown). Wipe the galvanized duct with mineral spirits to clean off any oils and wipe dry. Prime and paint orange the duct reducer for the body and at least one washer (Island Orange shown). Prime and paint blue another washer (Tropical Oasis shown); paint the T-plate and 1/4-in cap nut a flat black. Let dry and add second coats as needed, then spray the other sides of parts such as washers or the lip around the can.
Step 4
Cut pieces of polypropylene rope about 2 inches long and separate the fibers. Turn the can upside down and glue the fibers at the edge of the can on the side that will be the face. After the glue cures, slip the 4-inch galvanized clamp around the can so it covers the glue and tighten in place.
Step 5
Glue together the washers and cap nut for the eyes. Glue the eyes and nose to the can for the face. After the glue cures, thread nuts onto hex bolts of different diameters and fasten the bolts on the sides of the head using nuts on the inside of the can.
Step 6
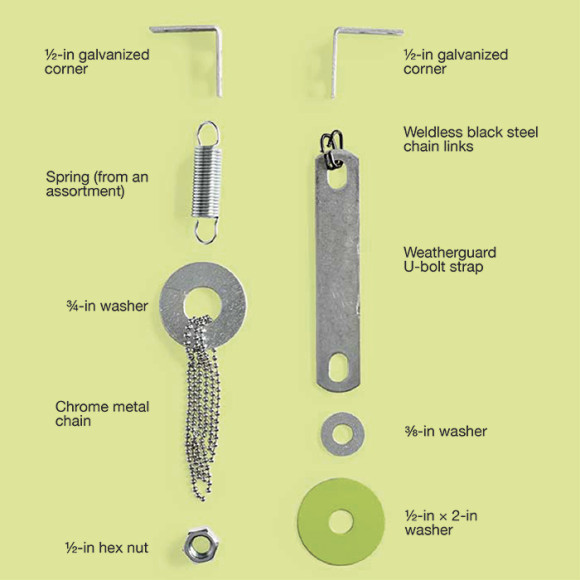
For one arm, attach a washer to one of the springs that has loops on both ends. Cut three pieces of chrome chain about 8 inches long. Thread the chains through the washer so they’re all looped in half, slide a hex nut around the chains, and wrap wire beneath the nut to hold it against the washer. Then attach the spring loop to a galvanized corner to form a shoulder.
Step 7
For the other arm, cut a piece of galvanized wire about 4 inches long. Thread it through a painted washer, a smaller flat washer, and one end of a U-bolt strap. Instead of cutting off the surplus wire, curl it in a coil after connecting the washers to the strap. Separate two links of black chain and pass them through the other hole in the U-bolt strap and an end hole in the other galvanized corner forming the other shoulder. Close the links.
Step 8
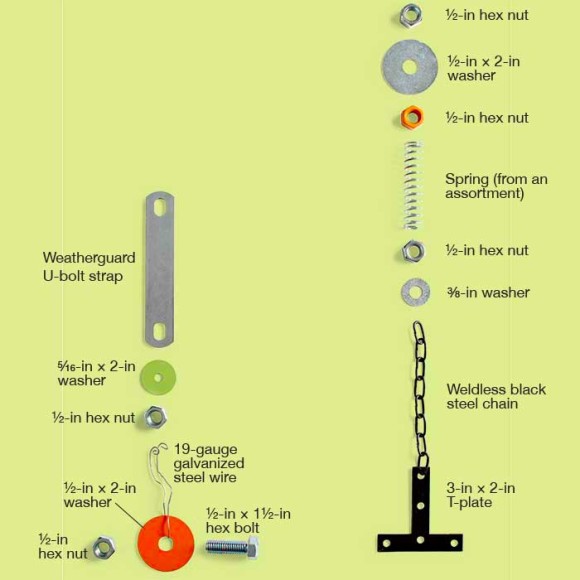
For one leg, cut a piece of galvanized wire about 5 inches long and fold it in half. Thread it through a painted washer, a 1/2-inch hex nut, a smaller washer, and one end of a U-bolt strap. Tie the wire and bend the surplus ends in a spiral coil. Place a hex bolt through the large washer and hold it in place with a hex nut.
Step 9
For the other leg, cut a 5-1/2-inch section of black chain. Open one end link and attach it to the T-plate. Thread the chain up through a washer, hex nut, spring, a painted hex nut, and washer.
Assemble the Wind Chimes
Step 1
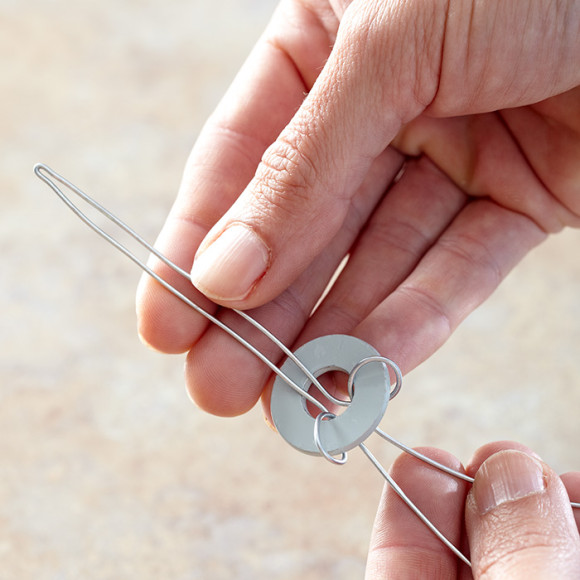
Cut two pieces of galvanized wire, one about 12 inches long and another 30 inches long. Fold the 30-inch wire in half and pass the bent end through a washer. Loop the loose ends back through the washer center to hold the washer in place about 4 inches from the bent end. Pull the wire tight to capture the washer on the wire.
Step 2
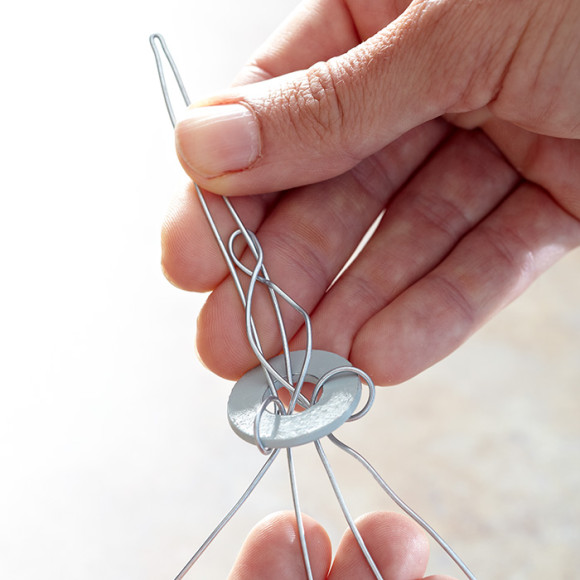
Fold the 12-inch wire in half. Feed the two ends through the top of the washer and, at the same time, wrap it around one strand of the 30-inch wire. Pull the ends down until the bend reaches the washer.
Step 3

Push the loop in the 30-inch wire up through the hole in the can from the inside and pull the washer tight against the can.
Step 4

Insert the narrow end of the duct reducer into the can opening and thread the ends of the 12-inch wires through the holes in the reducer. Pull them tight enough to hold the reducer just inside the can and bend the wire ends to hold the reducer in place. The ends of the 30-inch wire should extend through the bottom of the duct reducer.
Step 5
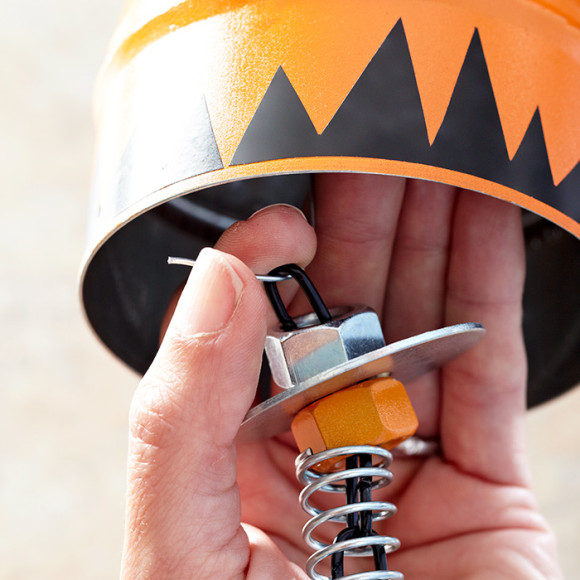
Pass one end of the 30-inch wire through the hole in the U-bolt strap of one leg, bend the wire so that about 3/4 inch of the strap is inside the duct reducer body, and trim off the surplus. Pass the other end of the wire through the upper link of the black chain on the other leg, bend it to draw a link of chain inside the duct reducer, and trim off the excess.
Step 6
Fasten the arms to the duct reducer body using the sheet-metal screws included with the corners. Avoid overtightening the screws in the thin duct metal.
Step 7
From the black duct tape, cut the mouth, spiked decoration for the duct reducer body, and 1/8-inch strips for the arm. Apply the shelf liner and press in place.
Step 8
Use leftover galvanized wire or narrow rope to hang the chimes where they won’t rub or knock against a post, house siding, or the trunk of a tree.
Project Source
Modern Day Moms
Modern Day Moms is an award-winning publication centered around motherhood that is real and unfiltered. Basically, we don't sugarcoat anything and aren't afraid to tell you the truth. Let's be best friends, we will make you feel more normal.




Leave a Comment